originally posted by LANDR.com: http://blog.landr.com/7-tricks-to-create-headroom-and-how-it-will-save-your/
The most common problem we see at LANDR is a lack of headroom. Ask any mastering engineer and they’ll say the same thing: if a track comes in too hot, there’s no room left to master. There’s even an acronym for it: ‘GIGO’ stands for Garbage In, Garbage Out (producers equivalent of YOLO?). Regardless of your gear and your studio setup, making sure there’s adequate headroom is the single best thing you can do for your mixes.
Headwhat?
Think of headroom as a ‘safety zone’ or the space for the loudest parts of your song (transient peaks) to extend fully without clipping which can result in a very harsh sound. Leaving headroom will do two things:
- Make your tracks more dynamic,
- Allow us the space to work our magic.
It’s also the best way to avoid getting this message in LANDR:

Here’s a visual example of a track without headroom:

What Went Wrong?
The track either had a limiter or compressor on the master bus, or it was mixed too hot. These kinds of levels leave no room for mastering. Tracks output at this volume may also cause clip distortion.
You say: “Yeah, but it sounds good!”
Perhaps to you, but this doesn’t mean it will sound good everywhere. This is why it is crucial to leave it to an unbiased third party to take care of the final steps and ready your track for the mass public.
7 Tips to Help you achieve Headroom in your Mix:
1. Use Your Eyes AND Ears

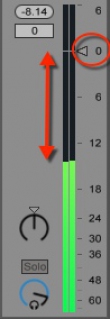
- Keep an eye on your master fader. The “0” is the clipping point. Ideally, at the end of your production, you should have around 6dBFs between zero and the highest peak of your song. If at the end of your mixdown, your master meter looks like this (above), you know you‘ve achieved a decent headroom.
- Below is a healthy, good looking wave shape: We call these files, “fishbone” because we can see transients and shapes.

2. Work With Your Channel Faders, Not Your Master Fader
Use your channel faders to avoid hitting zero in your master channel. When you exclusively lower the master fader, it may create some headroom but it’s likely that your DAW will still bounce a smashed (distorted) file. This is a very common problem.
3. Louder Doesn’t Always Equal Better
Everyone does it, we get excited because loud sounds good, so we crank up faders unnecessarily. If you are like me and need volume for vibe, simply turn up the volume of your sound system until it feels right. You can also work with compression on the master and disable it before bouncing and uploading to LANDR.
4. Work in 24 Bit
Many engineers are using 24 bit as a their default these days, the reason is not necessarily that 24 sounds better, but rather, it gives more space (hello headroom!) to work within. We’ll get deeper on Bit-depth in the next post as it is a monster of a subject but for now you can start here.
5. Don’t Jump Into Automation Too Early
Automating volume and effects changes can seem really enticing, probably because it is a very visual process but it’s also a common amateur mistake. Automating too early in the mix process will eat up headroom. Start off by making a rough mix with no automation, flesh out your track as much as possible and then use automation as a tool to make a more dynamic mix in the end stages.
6. Work Backwards From the Loudest Sections
Most DAW’s run linearly from left to right, chances are that you are starting from the beginning of a track, right? Try looping the loudest section and mix it first. Then move to the medium intensity sections and finally the lowest.
*Try Referencing classical or jazz and pay particular attention to the volume swells. Try to replicate these changes in your own mixes.
7. Pick an Element in Your Mix and Highlight it
Maybe you want the vocal and synth to drive the song? Decide ahead of time which parts of your arrangement are going to be on top volume wise and start there. After that work in other tracks underneath. Sound is physics, there is only so much space in a mix to work with.
It may take a few tries to make headroom a part of your workflow, but I guarantee you, your mixes will become far more dynamic with a far better feel and make for HUGE sounding masters. Get started with a new track, do it now! There’s no better time to start working on headroom.
Posted on LANDR by Rory Seydel: Musician in Noni Wo and Music Editor at MixGenius
(http://blog.landr.com/7-tricks-to-create-headroom-and-how-it-will-save-your/)

